|
|
by DWCourse
Author of the blog DWCourse.com which features tips, tricks, tutorials and a Free Dreamweaver Mini Course based upon my 12 years of experience as a web designer and instructor and actively participate in Dreamweaver discussions here and on Twitter as DWcourse.
Define your site
In order for Dreamweaver to manage your site successfully, you MUST define your site. Failure to define your site and to make sure you are working on the correct site is a common error when working on a shared computer and it will make your life miserable!
To define your site you:
- Tell Dreamweaver where the local copy of your site will be stored. The local site is the copy on your computer that you will be working with. Until you upload it to your web server, you're the only one who can see it.
- Tell Dreamweaver how to access your web server so that it can upload your files. Your site on the server is referred to as the remote site and is the one the world sees online. This is not required if you don't plan to post your site on a web server or if you haven't yet purchased cheap hosting.
Define your local site
- Select Site>New Site
- The Site Definition dialog will be displayed. If it is not already highlighted, click the Advanced tab.
- In the Advanced tab of the Site Definition dialog:
- Select Local Info from the Category list on the left.
- In the Site name field, type a name for your site. The Site name is used only by Dreamweaver and is for your convenience. Generally you want to choose a name that will help you recognize the site later.
- Click on the folder icon to the right of the Local root folder field and use the File dialog to navigate into the folder containing your website (if you haven't created that folder yet, do it now). Click the Select/Choose button. The path to your local folder will now be displayed in the Local root folder field. This is where you will build and store your website.
- The Default images folder information is optional. You can leave it blank.
- Choose Document from the Links relative to options.
Note: If you plan to view your site locally or from a CD, you must choose the Links relative to Document option. So, it's the safest choice for most users.
- If you know your site's web address (such as http://www.DWcourse.com) enter it into the HTTP address field. If you haven't registered a domain name or don't know the web address for your site, leave the field blank.
Warning: If you leave the HTTP address field empty, Dreamweaver will attempt to fill it (sometimes incorrectly) based upon the information you use to define your Remote Site (see 2.2 below). So it's a good idea to double-check this information after you define your remote site.
- Leave the Use case-sensitive link option unchecked.
- By default, the Enable cache option is checked. Leave it checked to speed the way Dreamweaver handles various housekeeping chores.
That's it for the Local Info. If you haven't yet made arrangements for hosting your site, you can click the OK button, skip to Chapter 3 and begin building your web page. Otherwise continue by defining your remote site.
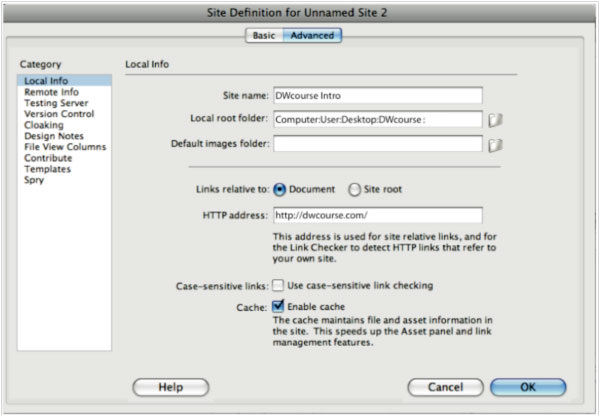
Fig. 1: The Local Info tab of the Site Definition dialog
Define your Remote Site
- Select Remote Info from the Category list in the Site Definition dialog. Initially the Remote Info tab looks rather empty. That will change once you tell Dreamweaver how you plan to connect to your server.
- Select FTP in the Access menu. FTP, which stands for File Transfer Protocol, is the most common method of accessing a web server. If you will be accessing your site by some other method you'll need to talk to your corporate web guru for help setting up the remote info.
- After choosing FTP from the Access menu, you'll be faced with a number of settings that need to be entered. Unfortunately, the possibilities for these options are nearly endless. You'll need to refer to the information provided by your hosting service. I'll give a common example below and try to point out some of the other likely possibilities.
- When you signed up for hosting, your service provider provided you with the information necessary to access your server. It should look something like this:
- Your Domain: dwcourse.com
- Your Username: myname
- Your Password: mypassword
- Your site's IP address: 12.34.567.89
- In the FTP Host field of the Remote Info dialog enter your domain name preceded by "www." (for GoDaddy hosting use ".ftp"). In the Login field enter your username and in the Password field enter your password. The Remote Info tab of the Site Definition dialog should now look like fig. 2.
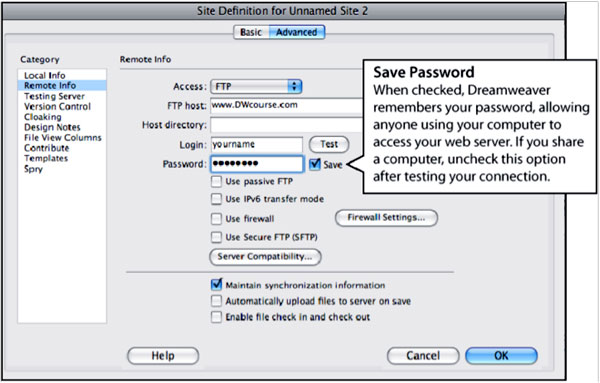
Fig. 2: The Remote Info tab of the Site Definition dialog.
Warning: When you enter a password, Dreamweaver automatically checks the Save box to the right of the password field. Unchecking the option deletes your password. If you are working on a computer with public access, allowing Dreamweaver to save your password will allow anyone using the computer access to your website!
Your password must be entered in order to test your connection. So enter it now. Later, after you have successfully tested your connection, make sure to uncheck the Save (password) option if you're on a public computer. Dreamweaver will then require you to enter the password each time you connect to your server.
- There is also a Host directory field. The host directory is the actual folder on the server where your site will reside. Unless your host has specified a host directory, leave the field blank for now. We'll revisit this option later.
- Leave the rest of the settings as they are and hope for the best.
- Test your connection by clicking the Test button to the right of the Login field.
- If everything has been set up correctly, you should receive the message Dreamweaver connected to your Web server successfully. Congratulations, click the OK button and skip to section 2.3 below.
- If you receive an error message make sure you entered the information exactly as provided by your hosting company. Remember, passwords (and possibly other information) are case-sensitive.
- With some hosting setups, the following may also help:
- Enter the IP address rather than the domain name in the FTP host field. This can be useful if you've just purchased hosting and your DNS information (Appendix B) hasn't yet propagated. If that's the case you'll be able to upload files to your site but you won't be able to see them online until the DNS information propagates.
- For FTP host, try "ftp." Rather than "www." before the domain name (i.e. ftp.DWcourse.com). If this is required, your web host should have informed you, but it's worth a try.
- Check the Use passive FTP option (this is sometimes required if you're operating behind a firewall).
If you still can't connect, talk to your IT department about possible firewall settings or server issues. Otherwise, contact your web host's support department for assistance.
Connect to your server
If you were able to connect to your server in step 2.2 above, now is a good time to make sure you are connecting to the right directory on your server.
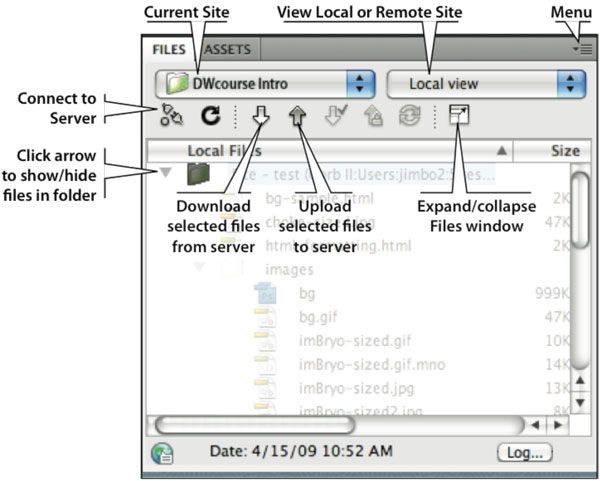
Fig. 3: The Files window as displayed in the palette dock.
In the Files window (fig. 3), Local view should be selected.
- Expand the Files window by clicking on the expand window icon. Your Local Files are still visible in the right half of the expanded Files window. The left half is for your Remote Site.
- As per the instructions in the Remote Site area, To see your remote files, click on the [connection] button on the toolbar.
- If you successfully connect to your server the Remote Files area should now look similar to fig. 4a or 4b.
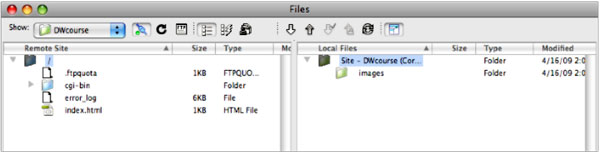
Fig. 4a: Files window while connected to the proper server root folder.
In the example above, .ftpquota, cgi-bin and error_log are used by the server for special functions. You can ignore them for now.
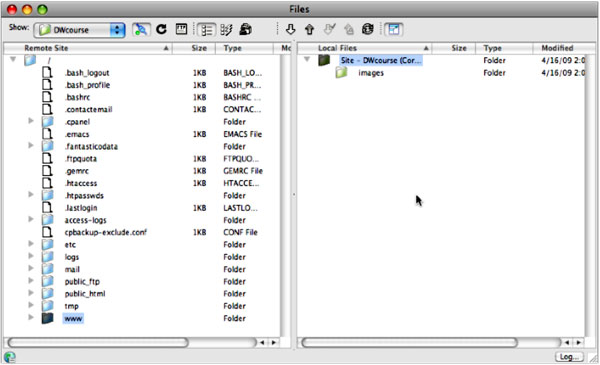
Fig. 4b: Files window while connected to the wrong server folder
In fig. 4b, .bash_logout, etc. are for server configuration files. The correct root folder is public_html OR www. This works because the folder www is an alias which points to public_html.
- If it looks like fig. 4a, congratulations. You're ready to build and upload web pages. by the way, if you see an index.html file on the remote site, it's just a placeholder. You'll be replacing it shortly with your own custom home page. Move on to the next chapter.
- If it looks like fig. 4b, you've got a bit of work to do before you'll be ready to upload pages to your web site.
- On the server, locate the folder that is meant to hold your web pages. Your web host should have given you this information but, if you're flying blind, the most common choices are httpdocs, public_html and www.
- Note the folder name EXACTLY including upper and lower case letters and any special characters such as underscores (in the case displayed in fig. 4b the proper folder is httpdocs).
- Select Site>Manage Sites or select Manage Sites from the Show pop-up menu in the toolbar at the top-left of the Files window.
- Select your site from the list of sites and click the Edit button.
- In the Site Definition dialog select the Remote Info category.
- In the Host directory field, enter a backslash (/), the name of the server directory from step ii above and another backslash (for the example above you would enter "/httpdocs/").
- Click OK in the Site Definition dialog then click Done in the Manage Sites dialog. Since you've changed your site definition, Dreamweaver will disconnect you from the server.
- Reconnect to your server by clicking on the connect icon in the Files toolbar. If you've followed the steps carefully, the contents of the server directory which will hold your website should now be displayed (similar to fig. 4a above).
Congratulations, at long last, you're ready to build and upload some web pages.
Before continuing, if you're still connected to your server, disconnect by clicking the connect/disconnect icon in the Files toolbar. Then shrink the Files window (if you haven't already done so) by clicking on its expand/collapse icon.
Warning: It's worth repeating: In order for Dreamweaver to manage your site successfully, you MUST, MUST, MUST define your site. Failure to define your site and to make sure you are working on the correct site is a common error when working on a shared computer. This is the most common cause of broken links and other problems on student sites.
|